Considering all Test automation
tool which supports Data Driven testing, then only we call it as Test
automation tool otherwise it’s just test tool.
When it comes to data driven testing for WebServices using
SoapUI tool, follow the steps below,
What is Data-Driven testing?
Quite simply put, data-driven testing is when
you store test data (input, expected output, etc) in some external storage
(database, spreadsheet, xml-files, etc) and then use that data iteratively in
your tests when running them.
Create Test Data for SendSMSToIndia request as follows. [Here I have taken SendSMS WebServices for
example. (http://www.webservicex.net/SendSMS.asmx?WSDL)]
Test Data
in Excel File
Before creation of test data we have to make sure that how
many fields requires test data in SendSMS request. Just open the SendSMSToIndia
request by double clicking or Right click and select Open Editor menu option.
The below screen shot for SendSMSToIndia request.
For the above three fields I have created the sample test
data as shown in the below screen shot. I have given Sheet name as “SendSMSTestData”
and saved it in the local system Driver (here I used D:\ drive) with the name
as Data_Manager_SendSMSToIndia.xls,
here one more important note is while saving the excel file after creating the
test data we should save as “.xls”
and SoapUI is not support any other format other than .xls.
Make sure you have created the project and added the Request
to Test Suite, to Test Case, to Test Step and DataSource and DataSource Loop
should be as shown in below screen shots.
In above screen shot you can see the hierarchy of the Test
Steps, make sure in you project the hierarchy same as above.
DataSource:-
Is Use to reads test data from external source(Excel, File, GRID, XML,
Database) into properties of request or can be used for validation.
DataSource
Loop:- Is Use to loop or iterate the DataSource till the last
row. Here we have select the DataSource and target step where we have to
provide our input data.[will be explain in below section].
Now Open the DataSource by double clicking on it or just
Right click and select open editor.
DataSource editor looks as below screenshot and the list of
available data source types so you can import test data and in that select
Excel option for importing the external data from excel file to SoapUI data table.
Once you selected the Excel as DataSource then click on the
Browse button to locate the Excel file which you created above, and enter sheet
name as “SendSMSTestData” . and
change the Option Start at Cell from ‘A1’ to ‘A2’ because in our excel sheet
cell A1 is our headings and our actual data starts from cell A2 hence it should
be A2.
Now create properties in properties pane you can see in left
side of the above screen shot. Click on the plus[+] sign pop with user
definable property name as below screenshot.
Click OK then you can see the properties in left pane as
below.[repeat for the remaining fields or columns in Excel sheet.]
And you can see the one checkbox as of now you can ignore as
it is unchecked.[will discuss it later].
Now all set to import the test data from Excel
sheet to SoapUI data table. To import click on the ‘Green’ button  from the DataSource header pane. Once you click on the green
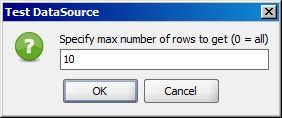
button then SoapUI ask user to import all the rows or import only limited rows
as below.
By default value will be 10 there you need to enter how many
rows you want to import. In my case I want to import all the rows from the
excel sheet so I will give zero [0] hence all the rows imported to SoapUI data
table as below screenshot.
Now time to map the DataSource properties to our Request.
Now SendSMSToIndia request in editor
mode as shown below. And here you can see all the three fields as,
·
MobileNumber:
·
FromEmailAddress:
·
Message:
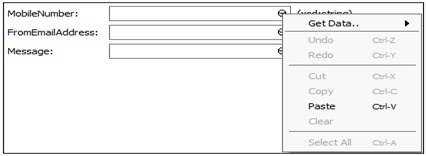
Here you can also see there is small button click on that or Right click
on the TestBox then you can see Menu with options in that as below.
 click on that or Right click
on the TestBox then you can see Menu with options in that as below.
In Menu you can see “GetData..”
option click on that and again you will see one more sub menu as in below
screenshot. And also you can see the DataSource name which we created above.
Now click on the DataSource option there you will see the
all the properties which are created in DataSource as below.
Now map the properties of the DataSource to the SendSMSToIndia request in editor, for
each field in the request select the appropriate property from the DataSource.
One you selected all properties the SendSMSToIndia
request in editor look as below.
Once the mapping is completed now open the DataSource Loop
by Double clicking or Right Click on it and Select ‘Configure’ option from
menu, then you will see as below pop window.
Now here you can see two list boxes first one is ‘DataSource Step’ here you should
select the DataSource, because from
DataSource Step only we are reading the External data where we imported our
excel file data into DataSource in above.
And second one is ‘Target
Step’ here you should select the SendSMSToIndia
request, because here DataSource supplies the Data from the DataSource selected
in DataSource Step’.
Once you selected the correct steps in Configure DataSource
Loop then, Configure DataSource Loop should look like as below screenshot.
Then Click on ‘OK’ button.
Now all set to run the Test Case for all the test data in
the DataSource. Running the Test case you have to open the Test Case Running
window you can double click on the Test Case or Right click and select ‘Show
Test Case Editor’ option from the menu.
And one more important note is the steps in the Test Steps
should be in the same arrangement. Like DataSource should be at first Step and
Request in Second and DataSource Loop should be always last.
 at the left top Corner of the
Test Case pane.
Once execution start you can
see the logs in Test Case Log pane ate below and a gree bar with “Finished”
message at the top indicates test case execution complted for the all the rows
in the DataSource.
That’s
all Floks.


