Wednesday, April 9, 2014

DataBase Testing With SoapUI


Hi All this is my new post on SoapUI which describe about the Database testing in SoapUI tool, which is mainly helps in validating your SoapUI response and the actual value present in Database.
               In this post I will describe how to do Database testing like, how to get connection with Database from SoapUI tool.

Before starting Database testing we have to get connect to the Database from the SoapUI, so we can get connection to the Database in 3 types, here in this post I will describe all 3 types of connection with DataBase from SoapUI.

Type I:- Get Database connection at Project level, by just following below steps.
              
  As I described in my previous post how to create Project, Test Suite and Test Case. Create project and right click on the project you created or double click on it and follow the steps, open the Project View.


Once you select or clicked on ‘Show Project View’ you will see the below screen in the right pane of SoapUI window, and after that click on ‘JDBC Connections’


And you will be seeing JDBC Connection pane in which we have to create New Database Connection, now follow the steps marked in the screenshot, once you click on the “+” sign as marked new popup box open, enter the DB Connection Name, and click OK,


Once you entered the DB Name and Click OK, you will see the below popup where we need to enter database details as shown in the below screenshot 


Click ‘Test Connection’ button to test the Database Connection, once after you filled all correct value into it,  if all the details are correct you will see message as “The Connection Successfully Tested” means successfully connected to the Database.[Here I have selected the Driver as “Oracle Thin/Oracle Jdbc Odbc driver”] as shown in below screenshot,


The same DB Name can be used in the in your Test Case JDBC Request step.


Type II:- Here we will see how directly we get connection to the database from JDBC Request Test Step in the Test Case. Here you can see the above created, DB name you can use the same or you can create new one. Here how it is as shown in below steps.
Add your request to Test Case (Follow my previous post to create Test Case and add request to Test Case). Now add JDBC Request to the test step.


Once you added the JDBC Request to the Test Step, open that step by double clicking or right click and select ‘Open Editor’. Then JDBC Request window will look like below screen.


In above screenshot as you can see the DBConnect name as it was created in the in Type I.

Assume you have not created or not connected to Database at project level, and now you want to connect to the Database at Test Case level, then you can select or Click on “<Create New>” option, once you selected ‘Create New’ you will see below screenshot New JDBC Connection popup box here enter the DB name, here I have entered DB name as ‘NewDBConnect’
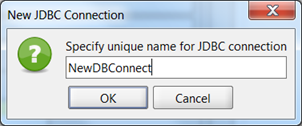

Once you Click ok you will see below window, in this you need to enter all the details to get connect to Database.


In above screen you can select any driver as per your need or as per your database, here I have selected Oracle Thin/JDBC driver. As shown in below screen.


Once you selected Driver, after that you need to provide all the details as Hostname, username, password, Port and SID and Click on Test Connection, if you get message as “The Connection Successfully Tested” means successfully connected to the Database. As shown in below screenshot.


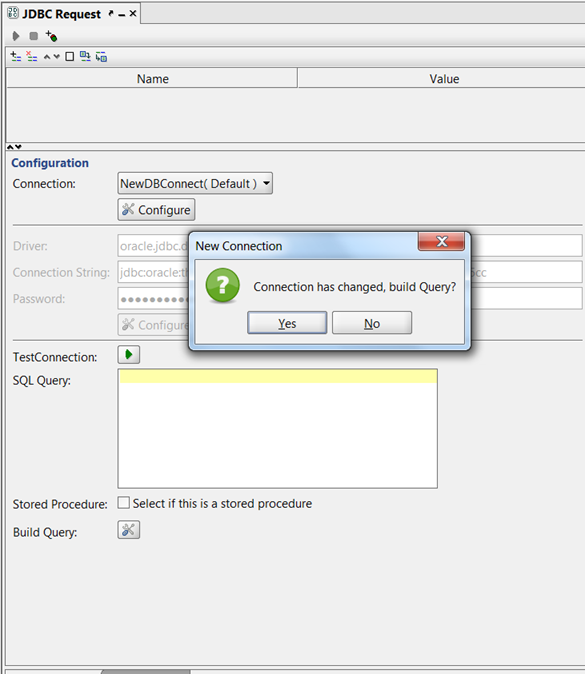
Once you click on “OK” button you will see below message box asking for take out to the new window where you need to build the query or select the table or write your own query to retrieve the result. In below screen select ‘Yes’ button you will see the next screen where you will find all the table which are present in your database as per your user access.


Once you are satisfied with your query build and you got the expected result, then just click on OK button,


Now you will come back to same JDBC Request window, and you can also see the query which you built in above screen in JDBC Request. Once you execute this query you will see query result in XML format or in form format in JDBC Request right pane, as shown in below screenshot.


Type III:-
               Now we will see how to connect to Database from the Groovy script, just add the ‘Grooy Script’ test step to your test case as shown in below screen.


Once you added the Groovy Script to the test case, write connect string to connect to database as shown in the below screen.


Here, Type-I and Type-II difference is, In Type-I, we create DB connection at project level then can use the same DBConnect reference throughout the project and use that in JDBC Request. In Type-II its just related to that particular test case and you cannot use outside the test case. This type of connection useful when you have to use different database for each Test Case then this will help you.

I hope this will help you in your project for Database testing.
In next post I will post some useful sql queries to retrieve the data from table in Groovy script.


That’s all Folks.


Thursday, December 26, 2013

Basics of WebService Testing Tool SoapUI


Hi, In this post I am going describe some basics of SoapUI tool, like Creating projects, Creating Test Suite and Test Cases and Some important features.

Let’s Start with creating Project.

Create Project :-

To create project we need to have WebService WSDL file or the WebService Link. Here I will refer WeatherForecastService webservice and below is the link.


Now go to SoapUI there you can see in left pane as Projects, Here we are creating new project so Right Click on it and select “New SOAP Projects”. As shown in the below screenshot.


Once you click on this menu option you will see one window popups with two fields, as ‘Project Name’ and ‘Initial WSDL’. You Can enter Project Name as per your requirement or you can keep this field blank also when you browse for the WSDL or service link, then automatically Project Name appears. Initial field click on the Browse button to locate the WSDL file stored in your system or enter the service link. Once you provided the WSDL or Service link the window looks as below. (Here I have provided “WeatherForecastService” service link).


As you can see project name as “WeatherForecastService”. Keep below three fields as it is and click on OK button. Now you are done with project creation. And your project in SoapUI Looks as in below Screenshot.


In Above screen shot you can see the WeatherForecastService has two Request or say Operations. One is ‘GetCitiesByCountry and another one is ‘GetForecastByCity’.


Now we are done with Project creation, now will move on to Creating Test Suite.

Create Test Suite & Test Case :-

Creating Test Suite is very simple; just follow the few steps as mentioned in below screenshots.
When we created Project for WeatherForecastService we have noticed there are two Requests, now we will create Test Suite for ‘GetCitiesByCountry’ request.

Click on the (+) sign to expand the Request, there you will see soap request as “Request 1


Now Right Click on the ‘Request 1’ and Click on Add to Test Case


Once you select you will see a popup asks for the Test Suite name and Test Case Name, There you can enter any custom name as per your requirements, and enter the Test Case name also as below.


Here I have provided Test Suite name as “GetCitiesByCountry_TestSuite”.


Here I have provided Test Case name as “GetCitiesByCountry_TestCase”.


Once you entered both Test Suite Name and Test Case Name, you will see the one more popup window which contains GetCitiesByCountry Request name in it just click OK button to complete the Test Suite and Test Case Creation.


After Click OK button the finally Test Suite contains Test Case look as below.


Now we are done with the Project, Test Suite and Test Case creation. Now I am going to tell you how to create or Add Test Steps to our Test Case.


To Add Test Steps as per your requirement, Just Right Click on the “Test Steps (1)” Click on ‘Add Step’ and select which step you want add, as below screenshot.


That’s all Folks.

Sunday, October 6, 2013

How to Add or Delete/Comment xml node or tag in SoapUI Request at Runtime


This is my new post after long gap, sorry for that. I am going to post this topic as everyone need this as I faced so many trouble while doing adding deleting or commenting tags ,I hope this will surely help you.

Here I go….

Add Tag:-

Staring with Add tag or node, to the SoapUI request xml. This case only works when the tag which you want to add should be present in “XSD” or say WSDL file, by chance you deleted tag and you want to add the same in request at runtime then this will help you.

As you all know SoapUI tool provide so many features for testing webservice, in that one of the outermost feature is Datasource, which helps us to do Datadriven testing, as I mentioned in my previous post same one.
Consider your wsdl file has below xml content (this is just for example).

Here I am using WeatherForecastService for my post purpose


(My sincere thanks to restful services)


<soapenv:Envelope xmlns:soapenv="http://schemas.xmlsoap.org/soap/envelope/" xmlns:ns="http://www.restfulwebservices.net/ServiceContracts/2008/01">
   <soapenv:Header/>
   <soapenv:Body>
      <ns:GetCitiesByCountry>
         <!--Optional:-->
         <ns:Country>India</ns:Country>
      </ns:GetCitiesByCountry>
   </soapenv:Body>
</soapenv:Envelope>

Considering above request xml, I want to add “City” after the “Country” node. (But make sure this only works when the City field present in XSD or WSDL file.)
To test the above service you have created some testdata as below


 In above screenshot as you can see SI.No 1 to 4 you want to add city tag and its values, in 5 case if you don’t want to enter any value in City tag so you have keep it blank, so I have used CityTagBlank column.

Now move on to SoapUI import your test data into SoapUI DataSource and follow the steps as below.
Step 1 :-
Once After importing the test data into DataSource, now go to your request, if your using SoapUI Pro version you will 4 tabs in request as ‘Form’, ‘Outline’, ‘Raw’ and ‘XML’. Click on XML tab you will see xml tags, in the xml file you can see “<ns:Country>” tag. Just after this tag Right Click and Click on GetData sele ct ‘Step1 DataSource’ and Click on Property CityTagOpen.


After selecting above property from Datasource do it same process for CityTagClose and CityTagBlank

Once done all your xml will look like same as below.


Just now you have created the dynamic tag in your request xml, now you have to provide the data into this tag, so now click or place cursor at between as shown below 


Once you place the cursor Right Click and select the City property from DataSource as shown in below screen shot.


Just now you have provided the value to the your newly created dynamic city xml tag it will look like as below,


Now you all set to run the request for all your test data.


Once you run this you will see your request xml look same as below.


In the above screenshot as you can see we have provided the dynamic tag and value as “Delhi” remember, above we have created the test data. The same value populated in “City” Tag.
Now we will see what value for second test case.


See above screenshot in second test case we have provided “Mumbai” as value for City tag.
Now time to see for Blank value in City tag how it will look like.


Remember in above test data for test case number 5 we have not set any value hence the “City” tag is balnk as per XSD schema.
Now we are done with adding the dynamic tag to the request at run time.

NOTE :-  This will work only when the tag is defined in the xsd schema otherwise it will not work.


Commenting  Tag:-

   Now we know how to add node at run time. Now it’s time to do reverse. You may this issue so many time while doing WebService testing as commenting or deleting the tags which is not necessary. For that my post will surely help you,

Let’s consider “GetForecastByCity” sample 

WebService(http://www.restfulwebservices.net/wcf/WeatherForecastService.svc?wsdl) in this request you will find two fields as “City” and “Country”. In test case where you want to comment the “City” or “Country” tag based on your test cases.

I have prepared some sample test cases where I am commenting tags based on my test data as below.


Here in above screenshot test case from 1 and 2 am I commenting “City” tag and for test case 4 and 5 I am commenting “Country” tag.

Import this test data into SoapUI DataSource, as described in my previous post. It will look like as below.


Now go to your request and click on the XML tab there you will see xml tags as below


Here I am going to insert the DataSource property for commenting the tags according to my tets cases at run time.
Put cursor in between <ns:GetForecastByCity> and <ns:City>, Right click and click on Get Data, select Datasource and click on “CityTagOpen” Datasource property as shown in blow screenshot.


And now put the cursor in between <ns:City> and <ns:Country> again Right click and got to GetData select DataSource and click on “CityTagClose” property.


Repeat the same process for Country, put the cursor after the “${DataSource#CityTagClose}”  property and in between <ns:City> and <ns:Country> again Right click and got to GetData select DataSource and click on “CountryTagOpen” property.


Now put cursor in between </ns:Country> and </ns:GetForecastByCity> Repeat the same same process to select the “CityTagClose” property from DataSource.


After all property set your xml will looks like


Above screenshot shows all xml tag open and tag close property set now, these property will read the value from DataSource and inserts actual value.

In above screenshot I have manually entered the value for City and Country, now I am going to insert these values also from datasource(mapping the datasource property to the field I have explained clearly in my previous post),  now the xml will look like below.


This is how actual xml looks like.

Now we all set to execute the request. When you run the request you will see the City tag and Country Tag will be commented as per test cases.

Here is sample how the xml will look after execution.
For test case 1 and 2 I have commented the City tag the same you can see in xml at run time.

Test Case 1


Test Case 2


And for test case 3 and 4 I have commented Country tag see below screenshot for Country tag commented at run time.


Now we all are done with Adding or Deleting/Commenting the soap request xml tags at run time.

Happy WebService Testing……


That’s all Folks.


Monday, May 20, 2013

Custom Report Generation from Data Sink in SoapUI Pro


As most of you all know report plays major role in any of the project, as business giant he don’t dig into and look he just look for end result i.e. Report. To generate the Excel report from SoapUI you need to just follow the below steps as i mentioned.
Create Test Data for SendSMSToIndia request as follows.  [Here I have taken SendSMS WebServices for example. (http://www.webservicex.net/SendSMS.asmx?WSDL)]
As all of you know how to do Data Driven testing as i mentioned in my previous blog. In the same way you have to create Test data in excel file.
Once you are ready with Test Data creation, then create one more excel file as follows for DataSink Report.
Here I have created the sample Report format as shown in the below screen shot. I have given Sheet name as “SendSMSReport” and saved it in the local system Driver with the name as Report_SendSMSToIndia.xls, here one more important note is while saving the excel file after creating the test data we should save as “.xls”and SoapUI is not support any other format other than .xls.


Now it’s time to create SoapUI project in SoapUI Pro tool as shown in below,

Make sure you have created the project and added the Request to Test Suite, to Test Case, to Test Step and DataSource, DataSink, Groovy Script and DataSource Loop should be as shown in below screen shots.
Now add Data Sink to the Test Step as shown in the below screenshot. To add Right Click on the Test Step and Select Add Step then select DataSink option.


Now the DataSink step will be added to your Test Step as show in below Screen Shot.


In the same way Add Groovy Step to the Test Steps which is used to validate or verify our expected result with actual result and same result can be used to update in DataSink.


In below screen shot you can see the hierarchy of the Test Steps, make sure in your project should be in the same hierarchy as same as below.


DataSource:- Is Use to reads test data from external source(Excel, File, GRID, XML, Database) into properties of request or can be used for validation.
DataSource Loop:- Is Use to loop or iterate the DataSource till the last row. Here we have select the DataSource and target step where we have to provide our input data.[will be explain in below section].
DataSink:- Is used to write Number of propertied to the External source.
GroovyScript:- Is used to write specific script for validation.


Now Open the DataSink by double clicking on it or just Right click and select open editor you will see below DataSink editor. There you can see DataSink with Dropdown list in the screenshot.


Now click on the Dropdown button. You will see list of Option to generate the report in different format.


In that select Excel Option from the list to generate the report in the Excel format as you created the sample format above. Once you select the Excel option you will see below screenshot.


In above Screenshot you can see File, Out File, Worksheet and Start at Cell with (Re)Generate Properties with One green button. Here all the fields are explained below.
File :- This is the file where which imports the sample format which we created above.
Out File :- This file is used to Update our results or reports from Datasink and stores into the  specified file at under given path.
Worksheet :- The worksheet name of the file to export the result
Start at Cell :- From which Cell you want to export the result.
Change the Option Start at Cell Default value from ‘A1’ to ‘A2’ because in our excel sheet cell A1 is our headings and our actual report updates starts from cell A2 hence it should be A2.

Now To import al the headers which are created in excel file to DataSink properties click on the browse button locate the Excel file path which you created above, do it same for File and Out File, once you located you will see as same as below screenshot.


Now click on the ‘Green’ button   (Re)Generate Properties:. Once you click on this button you will one more popup window named ‘Manage properties’ as shown in below screenshot.


In the Insert row number: enter value as 1(one) because in our excel file we have just created on row that too header so we have to give as 1 only. Now click on ‘OK’ button.
Now you will see in DataSink left pane editor all the headers we have created in the excel file are automatically created see below screen shot for more.


And also see the same property names are displaying in the below section in above screenshot.
Now Open the Groovy Script by double clicking on it or just Right click and select open editor you will see below Groovy Script editor. Here you can retrieve the data from any of the test step within the Test Case or from Projects and also from Other Test Suite and Test Cases with some limitations we will discuss this topic later.

Now follow the steps below to retrieve the data or result or value from the DataSource, From Response received for request.

Step 1:- Right Click on the Groovy Script Editor,
Step 2:- Goto Get Data click on DataSource select the property name which you want to compare with the actual result, here i am comparing the Actual and expected Status of the message.


Once you select the Expected_Status property then you will see one popup as below, click ok or you can provide your own name or just click ok.

Then SoapUI will generate code for as in below screen shot.


Now select the value from the response as you selected property value for DataSource.

Follow the steps..
Again right click on the Groovy Script editor as shown in below screenshot and goto 
“SendSMSToIndia - Request” click on it and click on Property[Response]. 


Now will see one more Select XPath window there you can see response which has all the fields, in that select the required field and click on OK.


Then you will see popup as shown in below screen shot click on, then SoapUI will generate code for you as shown in below screenshot,


Now write ‘IF.. Else’ condition to compare the two Actual and expected status value. If you know java little bit then you can write it, for those who don’t know here it is.


Now moving to Data Sink above you have created Data Sink step and also added excel report 
format. Now associate the values from Data Source, from Response or from Groovy Script result.
Follow the steps below,
Open the Data Sink editor you can at right hand side of the pane four properties as
TC.No :- The test case number we are taking it from the DataSource step property name ‘TC.No’
Expected Result :- Expected Result we are taking it from the DataSource step property name 
‘Expected_Status’
Actual Result :- Actual result we are taking from the Step ‘SendSMSToIndia - Request 1’ as we 
taken value in Groovy Script in same way.
Test Result :- Test result we are taking it from the Groovy Script result.

For more detailed follow the steps,
For TC.No = Right click and follow the Screen shot.


For Expected Result = Right click and follow the Screen shot.


For Actual Result = Right click and follow the Screen shot.


Click OK once you selected the required field.

For Test Result = Right click and follow the Screen shot.


Now all set to run the Test Case for all the test data in the DataSource to generate the Report in excel format. Running the Test case you have to open the Test Case Running window you can double click on the Test Case or Right click and select ‘Show Test Case Editor’ option from the menu.


And one more important note is the steps in the Test Steps should be in the same arrangement. Like DataSource should be at first Step and Request in Second, Groovy Script and Data Sink and DataSource Loop should be always last.

To Run the Test Case Click on the ‘Green’ buttonat the left top Corner of the Test Case pane.

Once execution start you can see the logs in Test Case Log pane ate below and a gree bar with “Finished”message at the top indicates test case execution completed for the all the rows in the DataSource and also Report is also generated in the path specified for Outfile.


The report will be looks like as below Screenshot.


Now you are ready with custom report.


That’s all Folks.